Quick tip:
Check the video below to quickly learn how to add apps to your Rambox workspace. ⬇️
In the main tab bar and within workspaces, you'll find a plus (+) button.

Once clicked, a drawer will open at the right of your screen:

There you'll see a view with all apps available in Rambox. You can filter them by category on the left list:

You can also find the app you're looking for by typing its name in the search bar:

If you can't find the one that you need, you can always add it as a custom one (Adding Custom Apps):

Once you click on the app you want to add, a new drawer with the app settings will open.
App's settings
Name
You can edit the app's name by clicking the pencil button at the right of the name. This name will be displayed in the app toolbar. By default, it's the app's name.

URL
Some apps require you to configure a specific URL. You'll have to follow a given template. Some apps could have more than one template option: you must configure at least one of them.

App logo
Apps have their own logo as their default image. You can change it with any image in your local machine. It must be a 128 x 128 pixels PNG file. Clicking on the logo will open a dialog, so you can choose your file.

For custom apps, you can either register a local PNG logo (as previously mentioned) or get the app's favicon from its URL by clicking on this button:


If Rambox cannot find the logo through this option, you can still add the custom app and the icon will be fetched in the apps' tab:


Once that's done, you can right-click on the app's icon, go to "Settings", and click the "Get app logo" button again.
Enable app
By disabling an app, it will no longer load, and therefore you'll no longer receive messages and notifications.
Allow sounds
Enable this option if you want Rambox to reproduce app's sounds. If you disable this option, this app will be muted.
Show app name
Set this option if you want to show the app's name in the app tab bar.
Allow notifications
Set this option if you intend to receive notifications of your app.
Profile
You can set a profile scheme for an app. It can be a certain profile or a "Private" one (if you want that the app to have an isolated profile). The default value for a root level app will be "Primary", and if it's nested in a workspace it will be "Inherit from Workspace". Apps like WhatsApp, Android Messages, Discord are mostly used isolated from other, which is why they have a "Private" profile by default. You can read more about profiles in this article: Profiles (Feature).
Unread counter
- Display in tab: Enable this option if you would like to see a badge in the app icon when you have unread notifications.
- Include in workspace (non-root level): Enable this option to add this app's unread notifications counter to the workspace unread counter.
- Include in global (root level): Enable this option to add this app's unread notifications counter to the global unread counter.
Spell checker
Select which language you want the spell checker to work with within the app. You can read more about this in the following article: How to configure Spell Checker?
Link handling
 How links are opened for this app:
- Default: open links with the default option set in our General Settings.
- Block all pop-ups: prevent all pop-ups from showing.
- Open all in pop-ups: open links in a new Rambox window.
- Open all in default browser: open links in your default browser.
- Open all in tabs: open links in a new tab.
You can read more about our different link-handling options in the following article: Link Handling.
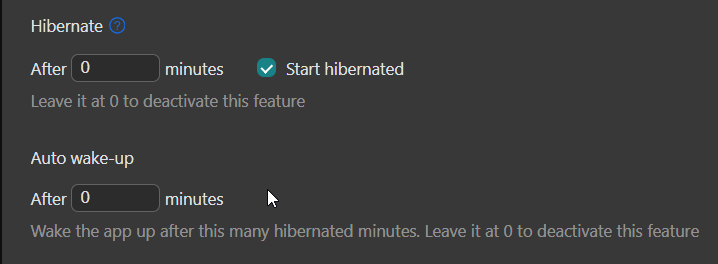
Hibernate
Set a time to hibernate the app when idle for a while. This will release memory and improve performance. Set it to 0 if you do not want the app to hibernate. When an app is hibernated, it will be disabled, and you won't get any notifications from it. Most apps have a 15-minute default hibernation time, but not the ones that belong to the Email or Messaging category. We offer the possibility to set that an app to start hibernated when Rambox initiates.
Also, you can set a timer for an app to automatically wake up from hibernation, so that you don't have to check them regularly and manually. Set it to 0 if you do not want the app to automatically wake up.
Advanced
*The following options may cause security problems, use them responsibly. To apply any of these options, you need to restart the app.
Inject JavaScript Code
You can inject custom JavaScript code into the app's website. This is great when you want to add custom functionality to each specific app.
For instance, some users wish to make an Auto-Refresh every X time because the app they are using is disconnected on inactivity. Here's an example script to auto-refresh the app every 10 minutes.
setInterval(function() {
    location.reload();
}, 600000);
Once you finish writing and testing your code, it will be a great practice to minify it before pasting it into Rambox. To minify it, you can use JSCompress.
Inject CSS Code
You can inject custom CSS code into the app's website. This allows you to change style details you prefer.
For instance, here's a script to change the app's background color.
.background {
    background-color: gray;
}
Stylish URL
You can apply style sets from User Styles to your app. Insert the style URL here to apply it.
User Agent
Sets the user agent for the app before the page is navigated to.
Proxy
If you need to use a proxy server, you can configure it here.

- Auto detect: the app will use the proxy configurations set in Rambox's General Settings.
- No Proxy: do not use proxy.
- HTTP, HTTPs, Socks4, Socks5: if you want to use a proxy, these options will show you some configuration fields for you to set.
Bear in mind that these configurations are "Profile-Specific", so any app using a shared profile will share these proxy configurations, too. You can read more about profiles in this article: Profiles (Feature).
Force Mobile Rendering
Some apps have different user interfaces depending on the device you access it. Set this configuration if you wish to force rendering the mobile alternative of the app.
Use Compatibility Mode
Disables features that can cause compatibility issues with some apps (for instance, browser verification for GitLab or ChatGPT).
Prevent Basic Auth
By default, Rambox shows a dialog where you can input the credentials needed to perform an HTTP basic auth, but in some exceptional cases, this dialog could interfere with some custom login flows. This option gives the possibility to disable that dialog.
After you have configured all these options, click the "Add" button. You'll see your app added to the tab bar where you clicked the "plus" button. Now you can log in to it.